
 A rare blog post and an extremely niche one. Have you ever tried to create a SSL private key file (PFX) from text certificates? I have and it’s taken me a long long time to figure out how to do it. As I couldn’t find any site with simple instructions on how to do it I thought I’d write it down. I now know this will be here next time I need to do it when I’ve completely forgotten.
Using Microsoft Azure is great for hosting sites but comes with little in the way of support unless you pay for it. That’s fair enough, it is aimed at much more qualified people than me. I needed to attach some SSL certificates to some sites and realised that Azure requires you to upload a PFX file containing the certificate. I bought my first certificate direct from Comodo, that cost £300 for three years, which is quite a lot money. Comodo supplied the certificate as a .crt file. That’s not accepted by Azure either but downloading Digicert Certificate Utility provides a really easy way to export as a PFX file.
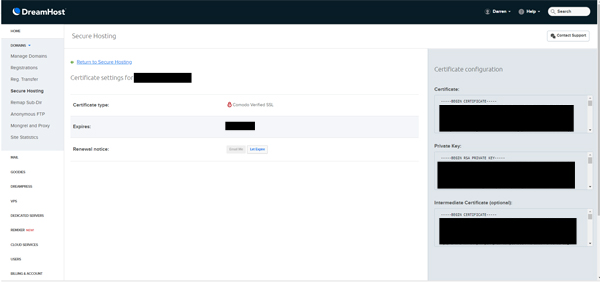
For hosting a lot of my sites I use Dreamhost who provide Comodo verified SSL certificates for $15 per year. I honestly don’t know what the widely different prices in SSL certificates are about but I assume a Comodo verified certificate is trustworthy. Dreamhost certificates are fine if you are hosting a site on Dreamhost, it just applies the certificate to the domain. It’s less useful if you are just hosting the DNS with them. They provide the certificate and private key in text format.
Given the $15 per year price I’ve been trying to figure out how to turn the text file into a PFX file. It’s taken a while to figure it out and I couldn’t find one site to tell me how to do it.
Step One – Create a TXT File
The first step is copying and pasting the text from the certificate and key into one file. The format for this is:-
—–BEGIN RSA PRIVATE KEY—–
(Private key text)
—–END RSA PRIVATE KEY—–
—–BEGIN CERTIFICATE—–
(Certificate text)
—–END CERTIFICATE—–
—–BEGIN CERTIFICATE—–
(Intermediate certificate text)
—–END CERTIFICATE—–
Save this file as your.domain_pem.txt
Step Two – Convert the TXT file
We are aiming to turn the TXT file into a format that Digicert can import and then export again as a PFX file. To convert the file you need to use OpenSSL.
Once you have OpenSSL installed you will need to run it from the command-line (I did all of this on a Windows machine). The first problem I encountered was not changing the command-line directory to the directory I’d installed OpenSSL in. Consequently, it didn’t recognise OpenSSL as a valid command. Once I’d navigated to the right directory I was away.
The command line instruction is:-
openssl pkcs12 -export -inkey your-domain_pem.txt -in your-domain_pem.txt -out your-domain_key.p12
A thing to note is that you do need the full path to your-domain_pem.txt or it won’t know where to find it. Honestly, I cheated and copied the file into the same directory as openssl.exe as I’m lazy. Running this command will, first of all, ask you for a password (input twice to verify) and then it will create a file called your-domain_key.p12.
This is all you need to create your exportable certificate.
Step Three – Create a PFX
To create a PFX file you need to open up Digicert and import your-domain_key.p12. As part of the import process, it will ask you for the password you created as part of Step Two. Once it is listed as one of your SSL certificates you can press “Export Certificate”.
When you export the certificate it will ask you to input the password twice.
Step Four – Use your certificate
You can easily add the newly created PFX file to Azure as a private key. It will ask you to input the password again as part of the upload process. You can then bind the certificate to the domain.
That’s it. I’ll be back here to read this once I forget how to do it.
